
A year and a half ago, when we went to Japan, my husband got me from Shibuya, the shopping district in Tokyo, a brand new Canon 5D mark III (for those who don't know it's a professional cam, good enough to film a TV ad!)
Since then, I've been buying books and magazines and downloading manuals online, and joining photography workshop trips… but somehow I always felt like nothing would work unless I learn the basics from scratch.

That's why I have joined the Nikon school for beginners: they teach the basics of photography for dummies such as myself and are kind enough to introduce me to my Canon! (Yes, Canon should've thought of this)
So because I enjoy sharing in this blog everything new that I learn, I will share with you everything that I learned and will learn in my classes, perhaps they could benefit another dummy like me.
For those of you who heard so much about the Leica but aren't sure what it is, well let's put it this way: If you want to offer someone who appreciates photography a really precious gift, go for the Leica.
It is the Bentley in a world of Kias. It's a German hand made camera that offers impressively easy handling, extreme robustness and excellent imaging quality.
The term SLR refers to Single-Lens Reflex that uses a mirror and prism system that permit the photographer to view through the lens and see exactly what will be captured.
A DSLR is a digital single-lens reflex camera (also called digital SLR): it's a digital camera combining the optics and the mechanisms of a single-lens reflex camera with a digital imaging sensor.
The first commercial Polaroid instant camera was unveiled in 1948 by the American Edwin Land, and it wasn't until 1963 that Polaroid introduced the instant color film despite the early attempts in the 1840's for colour photography. Baring in mind that KODAK introduced the first modern colour film which was called Kodachrome in 1935.
Speaking of Kodak, it was Steven Sasson who invented the first digital camera at Eastman Kodak in 1975.
Photography as we know it today, on a mobile phone, was introduced by Philippe kahn in 1997 who inserted the shoot and share camera into a Motorola Startac, the most popular mobile phone at the time. (he was eager to share a picture of his newborn with family and friends, hence the invention that took place on his daughter's birthday, on June 11, 1997).


When I want to view the image I want to shoot on screen instead of viewing through the viewfinder eyepiece or the eyecup, I switch to Live View, which is this one:

To get introduced to other buttons, we must learn the camera features, starting with the focus.
1- Manual focus
To focus manually, first make sure you have the AF / MF switch on your lens set to MF (Manual Focus)

Use the front ring on the lens to focus manually. Once you reach enough sharpness on the object you're focusing on, turn the ring a bit left, a bit right to make sure that this is the maximum sharpness you can get.
(You have 2 rings on your lens, one of them is to zoom in and out, the other is to focus manually)
To use the 3 other focus methods, don't forget to with the MF to AF button on your lens.
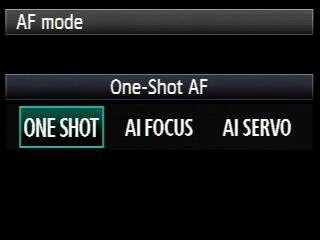
2- One shot single focus
To access it in the menu, press the AF. Drive button shown in the above 1st picture. Once the AF mode menu opens, let's chose ONE SHOT.
If, like me, you have noticed photographers in events point their camera at you, then move it around then point at you again before taking the picture, that's because they are using this feature.
The ONE SHOT is probably the most used method. It allows you to press the shutter half way down, the camera will focus and hold that focal distance until the picture is taken. You move around before taking the picture in order to reframe, while keeping the focus on the same object or person, then you fully press the shutter button in order to take that picture.
Try it, it's super easy.
3- Continuous Focus
That's the AI SERVO feature in the AF menu.

This method is good especially for shooting kids: when they're moving it follows them.
AI SERVO tracks focus on moving subjects as your subject moves closer or further away from your camera, it constantly updates focus to keep the subject as sharp as possible.
The only disadvantage of this feature is that it can be slow sometimes, and it consumes a lot of battery.
4- Automatic Auto-focus
That's the AI FOCUS feature next to ONE SHOT on the AF menu.
The AI FOCUS switches the AF mode from ONE SHOT to AI SERVO automatically if the subject starts moving.
After the subject is focused in the ONE SHOT AF mode, if it starts moving, the camera will detect the movement and change the AF mode automatically to AI SERVO AF.
This functionality it offers makes it the most recommended method to use focus.
In different cameras, the AF assist lamp assists the auto-focus, but unfortunately Canon 5D mark II and III does not provide this built in feature, and therefore disappoints photographers sometimes with the performance in low light.
Now comes the most important part you need to know to understand the main camera features.
I particularly love how this part was explained to me because using the terms "shutter", "aperture" and "ISO" was too mathematical for me, until made logical and simple for the dummy that I am:
3 things control the light when taking a picture:
1- Shutter Speed:
(Camera in TV mode)
In simple words, a camera shutter is a curtain in front of the sensor that stays close until the camera fires. When the camera fires, the shutter opens and fully exposes the sensor to the light that passes through the lens aperture.
The shutter closes immediately after the sensor is done collecting the light.
That's why we call the button that fires the camera "shutter". because it triggers the shutter to open and close.
The shutter speed (or exposure time) determines for how long will my image sensor be exposed to light:
The faster the shutter speed, the shorter the time the sensor will be exposed to light: it will freeze action completely:

This image is shot with 1/1600 shutter speed.
The slower the shutter speed, the longer the time the sensor is exposed to light: it can create a motion blur effect, where moving objects appear blurred along the direction of the motion.


These images were shot with a slow shutter speed, hence the motion blur effect. (waterfall shot: 5 second exposure).
Landscape photographers intentionally use slow shutter speeds to create a sense of motion on waterfalls while keeping everything else in focus.
So the shutter is responsible for creating dramatic effects by either freezing action or blurring motion.
Different shutter speeds will give you different effects.
Object in movement => slow shutter speed
Still object => fast shutter
very slow movement/ objects at night or in dim environment => slow shutter with Tripod.

To set Shutter Speed on your cam, turn the camera mode to TV, and then you can control it with the top wheel starting 1/8000 to 30" (on my Canon).
Bigger shutter => slow
Smaller shutter => Fast
there is 1 stop between every time lapse, meaning we multiply by 2 to move from one measure to another, as mentioned in the below figure (which was captured in the Nikon workshop).

If, like me you're already feeling this is a bit complicated, trust me it will get better with practice.
The shutter is the setting that has the widest range of possibilities:


Another thing worth mentioning here is the BULB.
Turn the camera mode to B.

This is a special shooting mode that opens the shutter for as long as you hold the shutter button down.
You can use it to take a picture of a lightening: you keep your finger on the shutter until there's a lightening then you release it.
The Bulb is also used for long exposure photography.
The longest shutter speed available is 30". But sometimes that's not enough. that's where the bulb setting comes in. Bulb will allow the shutter to stay open for as long as you hold the shutter button down.
I'm not an expert on this neither have I tried it, we can explore it more as soon as I know more about it.
2- Aperture:
(Camera in AV mode)
The Aperture as shown in the figure refers to the opening of the lens's diaphragm through which light passes. It is calibrated in f/stops and is written as numbers such as 1.4 , 2 , 2.8 , 4 , 5.6 , 8 , 11 and 16.
To understand Aperture, it has the same logic as the pupil of the eye:
When the eye is exposed to a strong light, it becomes smaller.
When it's darker and the eye is exposed to less light, it becomes bigger.
LARGE PUPIL SIZE = LARGE APERTURE
SMALL PUPIL SIZE = SMALL APERTURE
BUT:
the bigger the aperture number (f/64), the smaller the hole is.
The smaller the number (f/1.4), the bigger the hole.
SO:
LARGE PUPIL SIZE = LARGE APERTURE = SMALLER f
SMALL PUPIL SIZE = SMALL APERTURE = BIGGER f

The importance of Aperture is that it either adds a dimension to a photograph by blurring the background or magically brings everything in focus:
The size of the aperture has a direct impact on the depth of field, which is the area of the image that appears sharp.
A large f number such as f/32 (small aperture) will bring all foreground and background objects in focus.
A small f number such as f/1.4 (big aperture) will isolate the foreground from the background by making the foreground object sharp and the background blurry.
you can memorise it as such:
Small aperture => big f => sharp background
Big aperture => small f => blurred background
Every lens has a limit on how large or small the aperture can get.
The maximum aperture of the lens is more important than the minimum, because it shows the speed of the lens.
In my case, I have the 24-105mm. The maximum aperture is F/4. It's slower than a lens that has an f/1.2 or f/1.4 aperture.
So my lens is not very well suited for low light photography.
Why is this important? because maximum aperture means that the lens can pass through more light, and hence the camera can capture images faster in low-light situations.
A larger maximum aperture = ability to isolate subjects from the background.
All modern cameras provide at least f/16 minimum aperture (mine provides f/22), which is more than enough for everyday photography needs.
The below aperture and shutter speed combinations result in the same exposure:

3- Exposure: (ISO)
Cambridge in colours explains exposure in the best possible way:


Exposure compensation
When using an automatic exposure mode, the easiest way is to use the camera's exposure compensation function. To use it, we just turn the camera's quick control dial (on my cam), this way we can dial in exposure compensation while looking through the viewfinder.
If the photo is underexposed, we can increase exposure by a stop or 2, if overexposed, we can use exposure compensation to reduce the exposure.

And finally, which program should I use on my cam?
Camera exposure/ shooting modes
In a nutshell, that's how it works:

A+ Scene Intelligent Auto Automatic shooting mode. (camera controls everything)
P Program Camera controls Aperture & Shutter Speed.
You control the ISO
TV Shutter priority Camera controls the shutter speed.
You control Aperture & ISO
AV Aperture priority Camera controls the Aperture speed.
You control Shutter speed & ISO
M Manual You control ISO, Shutter and aperture.
B Bulb You control ISO & aperture.
Shutter is open as long as you hold the shutter button down.
C1- C2 - C3 Custom shooting modes that enable saving camera settings for future use.
Since then, I've been buying books and magazines and downloading manuals online, and joining photography workshop trips… but somehow I always felt like nothing would work unless I learn the basics from scratch.

That's why I have joined the Nikon school for beginners: they teach the basics of photography for dummies such as myself and are kind enough to introduce me to my Canon! (Yes, Canon should've thought of this)
So because I enjoy sharing in this blog everything new that I learn, I will share with you everything that I learned and will learn in my classes, perhaps they could benefit another dummy like me.
General knowledge about photography
(bits and pieces from here and there):
For those of you who heard so much about the Leica but aren't sure what it is, well let's put it this way: If you want to offer someone who appreciates photography a really precious gift, go for the Leica.
It is the Bentley in a world of Kias. It's a German hand made camera that offers impressively easy handling, extreme robustness and excellent imaging quality.
The term SLR refers to Single-Lens Reflex that uses a mirror and prism system that permit the photographer to view through the lens and see exactly what will be captured.
A DSLR is a digital single-lens reflex camera (also called digital SLR): it's a digital camera combining the optics and the mechanisms of a single-lens reflex camera with a digital imaging sensor.
The first commercial Polaroid instant camera was unveiled in 1948 by the American Edwin Land, and it wasn't until 1963 that Polaroid introduced the instant color film despite the early attempts in the 1840's for colour photography. Baring in mind that KODAK introduced the first modern colour film which was called Kodachrome in 1935.
Speaking of Kodak, it was Steven Sasson who invented the first digital camera at Eastman Kodak in 1975.
Photography as we know it today, on a mobile phone, was introduced by Philippe kahn in 1997 who inserted the shoot and share camera into a Motorola Startac, the most popular mobile phone at the time. (he was eager to share a picture of his newborn with family and friends, hence the invention that took place on his daughter's birthday, on June 11, 1997).
So what's the process of taking an image?
The Bayer Filter arranges RGB colour filters on a square grid of photo sensors.
The SENSOR, which is the most important part of a digital camera, comes in different sizes:
The DX format and the FX format.
The DX sensor has the smaller size, about the same size as the old APS-C film format. the lens area is smaller because the DX sensor captures a smaller field of view.
the FX sensor is the same size as a 35 mm film, but it is more expensive to make. That's why the more expensive/ professional DSLR cams come with a FX sensor.
Camera Menu
The menu button we will be using and accessing a lot is the Quick menu button "Q"
(talking about my Canon here)

When I want to view the image I want to shoot on screen instead of viewing through the viewfinder eyepiece or the eyecup, I switch to Live View, which is this one:

To get introduced to other buttons, we must learn the camera features, starting with the focus.
Focus
There are 3 ways to focus on cam:1- Manual focus
To focus manually, first make sure you have the AF / MF switch on your lens set to MF (Manual Focus)

Use the front ring on the lens to focus manually. Once you reach enough sharpness on the object you're focusing on, turn the ring a bit left, a bit right to make sure that this is the maximum sharpness you can get.
(You have 2 rings on your lens, one of them is to zoom in and out, the other is to focus manually)
To use the 3 other focus methods, don't forget to with the MF to AF button on your lens.
2- One shot single focus

To access it in the menu, press the AF. Drive button shown in the above 1st picture. Once the AF mode menu opens, let's chose ONE SHOT.
If, like me, you have noticed photographers in events point their camera at you, then move it around then point at you again before taking the picture, that's because they are using this feature.
The ONE SHOT is probably the most used method. It allows you to press the shutter half way down, the camera will focus and hold that focal distance until the picture is taken. You move around before taking the picture in order to reframe, while keeping the focus on the same object or person, then you fully press the shutter button in order to take that picture.
Try it, it's super easy.
3- Continuous Focus
That's the AI SERVO feature in the AF menu.
This method is good especially for shooting kids: when they're moving it follows them.
AI SERVO tracks focus on moving subjects as your subject moves closer or further away from your camera, it constantly updates focus to keep the subject as sharp as possible.
The only disadvantage of this feature is that it can be slow sometimes, and it consumes a lot of battery.
4- Automatic Auto-focus
That's the AI FOCUS feature next to ONE SHOT on the AF menu.
The AI FOCUS switches the AF mode from ONE SHOT to AI SERVO automatically if the subject starts moving.
After the subject is focused in the ONE SHOT AF mode, if it starts moving, the camera will detect the movement and change the AF mode automatically to AI SERVO AF.
This functionality it offers makes it the most recommended method to use focus.
In different cameras, the AF assist lamp assists the auto-focus, but unfortunately Canon 5D mark II and III does not provide this built in feature, and therefore disappoints photographers sometimes with the performance in low light.
The three pillars of photography
Now comes the most important part you need to know to understand the main camera features.
I particularly love how this part was explained to me because using the terms "shutter", "aperture" and "ISO" was too mathematical for me, until made logical and simple for the dummy that I am:
3 things control the light when taking a picture:

1- Shutter Speed:
(Camera in TV mode)
In simple words, a camera shutter is a curtain in front of the sensor that stays close until the camera fires. When the camera fires, the shutter opens and fully exposes the sensor to the light that passes through the lens aperture.
The shutter closes immediately after the sensor is done collecting the light.
That's why we call the button that fires the camera "shutter". because it triggers the shutter to open and close.
The shutter speed (or exposure time) determines for how long will my image sensor be exposed to light:
The faster the shutter speed, the shorter the time the sensor will be exposed to light: it will freeze action completely:

This image is shot with 1/1600 shutter speed.
The slower the shutter speed, the longer the time the sensor is exposed to light: it can create a motion blur effect, where moving objects appear blurred along the direction of the motion.


These images were shot with a slow shutter speed, hence the motion blur effect. (waterfall shot: 5 second exposure).
Landscape photographers intentionally use slow shutter speeds to create a sense of motion on waterfalls while keeping everything else in focus.
So the shutter is responsible for creating dramatic effects by either freezing action or blurring motion.
Different shutter speeds will give you different effects.
Object in movement => slow shutter speed
Still object => fast shutter
very slow movement/ objects at night or in dim environment => slow shutter with Tripod.
To set Shutter Speed on your cam, turn the camera mode to TV, and then you can control it with the top wheel starting 1/8000 to 30" (on my Canon).
Bigger shutter => slow
Smaller shutter => Fast
there is 1 stop between every time lapse, meaning we multiply by 2 to move from one measure to another, as mentioned in the below figure (which was captured in the Nikon workshop).
If, like me you're already feeling this is a bit complicated, trust me it will get better with practice.
The shutter is the setting that has the widest range of possibilities:


Another thing worth mentioning here is the BULB.
Turn the camera mode to B.
This is a special shooting mode that opens the shutter for as long as you hold the shutter button down.
You can use it to take a picture of a lightening: you keep your finger on the shutter until there's a lightening then you release it.
The Bulb is also used for long exposure photography.
The longest shutter speed available is 30". But sometimes that's not enough. that's where the bulb setting comes in. Bulb will allow the shutter to stay open for as long as you hold the shutter button down.
I'm not an expert on this neither have I tried it, we can explore it more as soon as I know more about it.
2- Aperture:
(Camera in AV mode)
The Aperture as shown in the figure refers to the opening of the lens's diaphragm through which light passes. It is calibrated in f/stops and is written as numbers such as 1.4 , 2 , 2.8 , 4 , 5.6 , 8 , 11 and 16.
To understand Aperture, it has the same logic as the pupil of the eye:
When the eye is exposed to a strong light, it becomes smaller.
When it's darker and the eye is exposed to less light, it becomes bigger.
LARGE PUPIL SIZE = LARGE APERTURE
SMALL PUPIL SIZE = SMALL APERTURE
BUT:
the bigger the aperture number (f/64), the smaller the hole is.
The smaller the number (f/1.4), the bigger the hole.
SO:
LARGE PUPIL SIZE = LARGE APERTURE = SMALLER f
SMALL PUPIL SIZE = SMALL APERTURE = BIGGER f

The importance of Aperture is that it either adds a dimension to a photograph by blurring the background or magically brings everything in focus:
The size of the aperture has a direct impact on the depth of field, which is the area of the image that appears sharp.
A large f number such as f/32 (small aperture) will bring all foreground and background objects in focus.
A small f number such as f/1.4 (big aperture) will isolate the foreground from the background by making the foreground object sharp and the background blurry.
you can memorise it as such:
Small aperture => big f => sharp background
Big aperture => small f => blurred background
Every lens has a limit on how large or small the aperture can get.
The maximum aperture of the lens is more important than the minimum, because it shows the speed of the lens.
In my case, I have the 24-105mm. The maximum aperture is F/4. It's slower than a lens that has an f/1.2 or f/1.4 aperture.
So my lens is not very well suited for low light photography.
Why is this important? because maximum aperture means that the lens can pass through more light, and hence the camera can capture images faster in low-light situations.
A larger maximum aperture = ability to isolate subjects from the background.
All modern cameras provide at least f/16 minimum aperture (mine provides f/22), which is more than enough for everyday photography needs.
The below aperture and shutter speed combinations result in the same exposure:

3- Exposure: (ISO)
Cambridge in colours explains exposure in the best possible way:
Achieving the correct exposure is like collecting rain in a bucket.While the rate of rainfall is uncontrollable, 3 factors remain under your control:- The bucket's width- the duration you leave it in the rain- The quantity of rain you want to collect.You just need to ensure you don't collect little (underexposed), or too much (overexposed).
There are many different combinations of width, time and quantity that will achieve this.
i.e, for the same quantity of rain you want to collect, you can get away with less time and a wide bucket. OR for the same duration you can have a really narrow bucket with less water.
In photography:
Aperture (f) = width of the bucket
Shutter speed = duration you leave it in the rain
ISO = quantity of rain you're collecting.
And just like the rainfall rate is out of your control, so is the natural light for a photographer.
The ISO speed determines how sensitive the camera is to incoming light.
It also correlates with how much the exposure increases/ decreases.
But unlike aperture and shutter, a low ISO is almost always desirable, because higher ISO means more noise.
That's why we only increase ISO when the desired aperture and shutter speed aren't otherwise obtainable.
In general, during the day we use a low ISO (my sensor is less sensitive to light)
By night we use a higher ISO (sensor very sensitive to light).
The light meter tells my camera the right combination of ISO, shutter speed and aperture.
Metering

Metering is when my camera determines what the correct shutter speed and aperture should be, depending on the amount of light coming into my cam and the sensitivity of the sensor. Every DSLR today has an integrated light meter that automatically measures the reflected light and determines the optimal exposure.
If you are struggling with exposure, it may be because you don’t fully understand the way the metering mode that you are using works.
There are 4 metering modes in our Canon 5D:

- Evaluative metering (most recommended! It makes it easier to measure exposure with off-centre subjects)
- Partial metering (it works well for metering brightly lit subjects against dark backgrounds)
- Spot metering (mostly used to avoid contre-jour or when you have a bright subject against dark background)
- Center-weighted average (subjects in the centre of the frame, light behind them)
When using an automatic exposure mode, the easiest way is to use the camera's exposure compensation function. To use it, we just turn the camera's quick control dial (on my cam), this way we can dial in exposure compensation while looking through the viewfinder.
If the photo is underexposed, we can increase exposure by a stop or 2, if overexposed, we can use exposure compensation to reduce the exposure.

And finally, which program should I use on my cam?
Camera exposure/ shooting modes
In a nutshell, that's how it works:
A+ Scene Intelligent Auto Automatic shooting mode. (camera controls everything)
P Program Camera controls Aperture & Shutter Speed.
You control the ISO
TV Shutter priority Camera controls the shutter speed.
You control Aperture & ISO
AV Aperture priority Camera controls the Aperture speed.
You control Shutter speed & ISO
M Manual You control ISO, Shutter and aperture.
B Bulb You control ISO & aperture.
Shutter is open as long as you hold the shutter button down.
C1- C2 - C3 Custom shooting modes that enable saving camera settings for future use.
No comments:
Post a Comment